A mom's journal of the sweet things in her life...

Sunday, February 28, 2010

Chocolate Chunk Cookies

When my mom retired about 5 years ago, I bought her the "Barefoot Contessa: Parties" cook book, because she was excited to finally have some free time to start doing more of the things she loves.  She likes to host dinner parties for their friends, and often times, she'll call me to ask me for suggestions about what to make, or for a recipe.  I thought the book would be the perfect gift for her and when I gave it to her, it truly was with the best of intentions.  However, I must admit that I have borrowed the book from her on many occasions, (sometimes for weeks at a time).  And truthfully, if I'm being honest, I'd have to say that I've benefited more from the book than she has.  The book is 'currently' located at her house, and so when I decided I wanted to make cookies,  and that the cookies I wanted to make happened to be in her cook book, I had to ask her to email me this recipe.  And, true to form, my mom pulled through for me.  I received her email first thing this morning and my day was set!  Thank you mom!


Everyone has their own idea about what makes the perfect Chocolate Chip Cookie.  My prerequisites include a buttery, full-flavored batter that is not over shadowed with too much chocolate, good quality milk chocolate chunks are my preference (semi-sweet chips have their place but we're talking about perfection), a crispy edge, chewy middle, and not too thick.  I HATE thick, dry, or cakey CCC.  And I feel very strongly that cinnamon and nuts have no place in a perfect CCC.  Sorry, but there are no exceptions.
I halved this recipe because, surprisingly, I had never tried it before. I wish I had made the full recipe because now I'm just going to have to make more.  These cookies are delicious and buttery and as close to what I consider perfection as I've ever come. 
Recipe for Chocolate Chip Cookies:
by Ina Garten
1 c. unsalted butter at room temp.
1 c. light brown sugar, packed
1/2 c. white sugar
2 t. vanilla
2 large eggs
2 c. flour
1 t. baking soda
1 t. kosher salt (don't substitute table salt here)
1 1/4 lb chocolate chunks (I used less)
Preheat oven to 350 degrees.
Cream butter and sugar till fluffy.
(remember I halved the recipe so my batter doesn't look as fluffy)
Add vanilla and then the eggs one at a time.  Mix well.  Sift flour, baking soda and salt together in a separate bowl.  Add to butter mixture with the mixer on low, mixing only until combined.  Fold in chocolate chunks.
I couldn't get to my favorite chocolate store (Bernard Callebaut), so I bought 3 milk chocolate bars from Purdy's.  I still consider these a splurge, their milk chocolate is delicious.  I think that next time, though, I will cut the chunks larger.
Drop the dough on parchment lined baking sheets using a rounded tablespoon.  
They do need a lot of space in between them as they spread considerably.  I also placed a chocolate chuck on top of each cookie, otherwise you won't see them at all and that just wouldn't do...

For my second sheet of cookies, I added three chunks to the tops, as I didn't think one was quite enough.
FINALLY...the recipe says bake for "exactly 15 minutes" and that they may seem underdone, but that's what you want.  Well...when I checked my first batch at 13 minutes, they looked very done.  Not ruined...but certainly not underdone as the book says.
And then, for reasons unknown to me, my second batch needed the full 15 minutes to achieve the golden color I like. 
The cookies on the left are my first batch done at 13 minutes and the on the right the second batch done at 15.  I think they look better...they have more chocolate showing.
Now, I really struggled over whether I should share these next two pictures with you... I would think it's fairly obvious why.  But in the end, I couldn't resist.
My husband took the kids shopping on Saturday morning for a helmet for my daughter who just got her first pair of skates. Dylan tried this shark helmet on at the store and hasn't taken it off since.  (Well, except for bed, but first thing this morning, he put it back on.) Sigh.

Friday, February 26, 2010

MOIST Chocolate Cake

Either my "Dry Cake Curse" has been lifted because the Baking Gods have finally taken pity on me, or I'm just getting more skilled at baking cakes with all my recent practice (4 cakes in less than 2 weeks - the first 2 of which were drier than the Sahara).  But then again, I think maybe I've only just recently found some very good recipes.
I was very happy (ecstatic actually) with my last chocolate cake by Ina Garten (even though the picture below was not very impressive, the cake itself was delicious and moist).  See previous post.  Even still, I had a nagging feeling that I should try one more recipe, just to see...
I found the "Hershey's Perfect Chocolate Chocolate Cake" recipe while perusing one of my favorite blogs "Obsessed with Baking".  I would include a link but I'm not that advanced in the world of blogging yet. Blogger "Steph", uses the recipe in several posts, and the fact that the recipe was similar to Ina Garten's recipe, in that it uses oil instead of butter, I decided to try it out.  Success!  I'm so happy!  The cake is delicious and chocolatey and more importantly, MOIST!  I did take a couple liberties with the recipe, I switched out the cup of boiling water for 8 ounces of espresso.  And I used Fry's Cocoa (that's all I had)  so I guess I have to change the name of the recipe.) Regardless, it was delicious!  I'm on a roll!  Go me! (And thank you Steph!)
Perfect Chocolate Chocolate Cake Recipe:
(found on "Obsessed With Baking Blog" and adapted ever so slightly)
2 c. sugar
1 3/4 c. flour
3/4 c. cocoa (sifted)
1 1/2 t. baking powder
1 1/2 t. baking soda 
1 t. salt
2 eggs
1 c. milk
1/2 c. vegetable oil
2 t. vanilla
1 c. freshly brewed espresso or coffee
Preheat oven to 350 degrees.  Grease and flour two 9 inch round baking pans.
Whisk together sugar, flour, cocoa, baking powder, baking soda and salt in large bowl.  Add eggs, milk, oil and vanilla.  Beat on medium speed of mixer for 2 minutes.  Stir in boiling water (or coffee of espresso).   Pour batter into prepared pans. 
Bake for 30 to 35 minutes or until toothpick comes out clean. Cool 10 minutes; remove from pans to cooling rack.  Cool completely.


As soon as it came out of the oven, I knew it was going to be good and moist, 
without even tasting it...
I also loved the fact that the layers came out perfectly even, no need to trim...
making layering them so easy...
and icing it a breeze.  If all my pictures seem like overkill, 
it's only because I'm trying to redeem myself.
I used a family "recipe" for the icing.  It's the same frosting that's always covered all my grandma's, great aunts' and mom's brownies, cakes and cupcakes.  I've always loved it...problem is there's not really an exact recipe per se.  It's a "dollop" of this and a "dash" of that and you simply keeping adding stuff until you get it the way you like it.  So, today I actually took the time to record what I used so that I could post it.  This is not ground breaking, but it is good. 
Really Good Chocolate Frosting:
(family 'recipe')
4 ounces of cream cheese (softened)
1 c. butter (room temp.)
3 c. icing sugar
1/2 cup cocoa sifted
1 T. vanilla
1/8 t. salt
1 T. milk
Beat the cream cheese and butter until light and fluffy. Add 2 cups of the icing sugar and the cocoa and mix on low speed to combine.  Beat at higher speed until creamy. Add vanilla.  Beat.  Add remaining cup of icing sugar and salt (to taste) and beat until creamy.  Add milk one tablespoon at a time, until you get the consistency you want for decorating your cake.  (I only added 1 T. 

Wednesday, February 24, 2010

Chocolate Cookies Two Ways


Irony:  I have been baking sweets almost daily while trying to do Weight Watchers. 
Anyway, tonight's baking adventure involved a recipe from one of my favorite cookie books: "Martha Stewart's Cookies".  Besides the reliable and consistently good recipes, my favorite thing about the book is the table of contents.  It categorizes the cookies by texture (i.e. light and delicate or soft and chewy or crumbly and sandy).  AND each cookie is accompanied by a picture in the table of contents which makes it easy to find the right goodie to satisfy your craving.
So, under the 'soft and chewy' heading, I settled on 'Grammy's Chocolate Cookies' which are a dark chocolate cookie rolled in sanding sugar.  Yum!  I had half a bag of very good white chocolate chips in the freezer that were calling my name so I divided the dough in half and put the chips in one half and then followed the recipe with the sanding sugar for the second half.
Both versions are pretty good.  There's just nothing wrong with dark chocolate cookies studded with white chocolate chips.  (They did seem to come out thinner though...not sure why.) The original version, with the sanding sugar, are pretty and sparkly and have a wonderful crunch but they are a little too sweet, it may be better to dip the top half in the sugar as opposed to rolling entire dough ball in it.  Will I make these again?  Probably not. There are much better recipes out there...but these ones were not bad.


Recipe for Grammy's Chocolate Cookies
adapted from Martha Stewart
2 c. plus 2 T. flour
3/4 c. cocoa powder
1 t. baking soda
1/2 t. salt
1 1/4 c. unsalted butter, room temp.
2 c. sugar
2 large eggs
2 t. vanilla
sanding sugar for rolling
*I added white chocolate chips to half the dough


Sift flour, cocoa, baking soda and salt in bowl.
In bowl of stand mixer fitted with paddle attachment, beat butter and sugar on medium speed until light and fluffy (2 minutes).  Add eggs and vanilla and beat to combine.  Reduce speed to low and gradually add flour mixture.  Beat to combine.  Form dough into flattend disk and wrap in saran wrap.  Refrigerate until firm.  (I put mine in freezer for 30 minutes)
Preheat oven to 350 degrees. Shape dough into 1 1/4 inch balls.  Roll each ball in sanding sugar and place on baking sheet with parchment paper.  Bake until set 10 to 12 minutes.  Cool 5 minutes on baking sheet before putting on cooling rack.


What you can't see in the picture above is how the sugar melted into the cookie creating a crunchy shell.
How many points did I just eat???  Was it worth it?

Tuesday, February 23, 2010

Finally...a Really Moist Chocolate Cake


I promise that this picture does not do the cake justice.  I was trying to capture the dense and moist (yes moist!!) texture of this amazing chocolate cake.  This was my third attempt in 2 weeks at finding a good chocolate cake recipe that actually delivers an intense, but not overwhelming, chocolate flavor and a moist texture that so many recipes boast but rarely deliver.  Rarely in my kitchen, anyway, but maybe that's just me.  This long over due success story is thanks to Ina Garten's cook book, "Barefoot Contessa at Home".  I had forgotten how much I love Ina.

This is a no-non-sense recipe.  No fiddling around with beating butter and sugar and alternating the addition of dry ingredients with the wet. I literally threw this together this morning while feeding my kids breakfast.  I then abandoned it on the counter until much later, at which point I very half-heartedly finished it with the whipping cream I found in my fridge. 

I do, whole-heartedly love this cake though and I will be making it again (very soon) for my dad's birthday party.  When I do, I will give it the time it deserves and make a proper white chocolate truffle filling and icing. (The one pictured above was done so...well...half-heartedly as I was dealing with dinner). I will post the recipe for the truffle filling when I find it amongst my collection of recipes.  But, for now, I leave you with this: 

Really Good, Moist Chocolate Cake Recipe
based on Ina Garten's "Beatty's Chocolate Cake" 

1 1/2 c. flour
2 c. sugar
3/4 c. cocoa powder
2 t. baking soda
1 t. baking powder
1 t. kosher salt
1 c. buttermilk (I used whole milk and added 1 T. vinegar)
1/2 c. vegetable oil
2 large eggs (room temp.)
1 t. pure vanilla extract
1 c. freshly brewed coffee (I used espresso)

Preheat oven to 350 degrees.  Butter 2 9" round cake pans.  Line with parchment, then butter and flour the pans.

Sift flour, sugar, cocoa, baking soda, baking powder and salt into bowl of stand up mixer fitted with paddle attachment.  Mix on low speed until well combined.  In another bowl, combine milk, oil, eggs and vanilla.  With mixer on low, slowly add the wet ingredients to the dry. Scrape down bowl.  With mixer on low, add coffee and stir just to combine, scraping the bottom of the bowl with a rubber spatula.

Pour into prepared pans and bake for 30 to 35 minutes or until toothpick comes out clean.  (I baked for 30 minutes.)  Allow to cool for 30 minutes before turning them out  onto a cooling rack and cool completely.


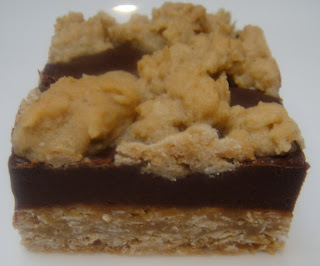
Oatmeal Fudge Squares


These gooey chocolate oatmeal treats are reminiscent of a certain bar sold at Starbuck's called "Fudge Oat Bars".  They are amazing, and I've wanted to find a recipe that replicates the Starbuck's version.  I found it courtesy of Dorie Greenspan's "Baking From My Home to Yours".  Dorie's version titled "Chocolate Oatmeal Almost-Candy Bars" calls for raisins and peanuts incorporated in the fudge layer.  I omitted both because (a) I don't like raisins, (b) my son is allergic to nuts, and (c) the Starbuck's version does not contain either.  I don't think those omissions compromised the bars though because these are truly delicious.

The recipe calls for 2 cups of chocolate chips in the fudge layer.  I used them only because I didn't have any other chocolate in the house.  However, I think the next time I tackle this recipe, I will use a higher quality chocolate, just to boost the wow factor.  I wonder what they'd be like with white chocolate fudge...or maybe white chocolate chunks in the oatmeal layer?  Hmmm... next time.

Recipe for Oatmeal Fudge Squares:
inspired by Dorie Greenspan

For the oatmeal layer:
2 1/2 c. flour
1 t. baking soda
1 t. salt
1/2 t. ground cinnamon
1 c. unsalted butter, room temp.
2 cups packed light brown sugar
2 large eggs
2 t. vanilla
3 c. old-fashioned oats

For the chocolate layer:
14 ounces sweetened condensed milk
2 c. chocolate chips (or 12 ounces of a good quality chocolate)
2 T. unsalted butter
1/4 t. salt
1 t. vanilla

Preheat oven to 350 degrees.  Butter a 9x13 baking pan.

To make oatmeal layer:  Whisk flour, baking soda salt and cinnamon.  Beat butter with paddle attachment of stand mixer until soft and creamy.  Add brown sugar and beat for 2 minutes.  Add eggs one at a time, beating for 1 minute after each addition. Beat in vanilla. Reduce speed to low and add dry ingredients, mixing only until incorporated.  Still on low speed, add oats.  Set aside 1 1/2 cups of the mixture for topping.  Turn remaining dough into the buttered pan.  Gently press dough evenly over bottom of pan.

To make fudge layer:  Set heatproof bowl over saucepan of simmering water.  Add condensed milk, chocolate, butter and salt.  Stir until melted and smooth.  Pour over the oatmeal crust then scatter the reserved mixture evenly over top. Bake for 25 to 30 minutes or until topping is golden and the chocolate layer is dull and starting to pull away from sides of pan.


Transfer the baking pan to a rack and cool for about 2 hours.  Run a blunt knife between the edges of the cake and the pan and turn the cake out onto a rack.  Turn right side up and refrigerate for at least an hour before cutting.

*Note:  In Dorie Greenspan's version, she recommends eating these cold.  They are definitely good cold, more like the fudge oat squares at  Starbuck's.  But if you like your chocolate on the gooey side, serve them at room temperature. The picture below is cold.


Monday, February 22, 2010

Lenox Almond Biscotti


I love biscotti!  And due to the fact that it's supposed to be dry, it's basically fool proof!  I typically use the recipe from my "go-to-book" called "The Best Recipe", but I decided to branch out and try something new. This recipe is from Dorie Greenspan's "Baking From My Home to Yours".

These cookies have cornmeal in them, which make them a pretty yellow color, gives them a nice texture, and makes them my new favorite biscotti recipe. I also added a handful of dried cranberries to mine.  It calls for quite a bit of almond extract, typically I omit that from all recipes because I find it too strong and over powering.  However, in the spirit of trying something new, I put in half.  Next time I will omit it completely. (It didn't ruin them by any stretch, but I don't think these cookies need it.)

Recipe for Lenox Almond Biscotti:
(adapted from Dorie Greenspan)

1 1/2 c. flour
1 1/2 t. baking powder
1/4 t. salt
1/2 c. yellow cornmeal
8 T. unsalted butter (room temp.)
1 cup sugar
2 large eggs
1 1/2 t. pure almond extract (I used 1/2 tsp.)
3/4 c. sliced almonds
* I added handful of dried cranberries with the almonds

Preheat oven to 350 degrees.  Line baking sheet with parchment paper.

Whisk flour, baking powder, corn meal and salt together. 

Beat butter and sugar with paddle attachment of a stand mixer at medium speed for 3 minutes. Add eggs and continue to beat another 2 minutes.  Beat in almond extract.  Reduce speed to low and add dry ingredients, mixing only until incorporated. Toss in almonds (and cranberries if you like) and mix.

Divide dough in 2, and create 2 logs 12 inches in length and about 1 1/2 inches wide.  Bake 15 minutes or until slightly golden.  (Logs will be still be quite soft).  Remove from oven and let cool for 30 minutes. Cut logs into 3/4 inch slices. Replace cookies onto cookie sheet, cut side down and put back into oven.  Bake another 15 minutes or until golden and firm to the touch.  Let cool to room temperature.


Saturday, February 20, 2010

Seared Beef on Rosemary Crostini with Cranberry Relish


My good friend had us over for dinner and her husband (also good friend) served us this for an appetizer.  It was delicious and so I knew it would eventually make its way into my own kitchen.  He got his recipe from Chris Knight in "License to Grill", and so I worked off of that, but tweaked it slightly.  The original recipe calls for thyme, which I do like however, I love rosemary, and so I switched out the thyme.  I was surprised to see how simple the cranberry sauce was, it called for dried cranberries, vinegar and honey and required no cooking.  I decided to make my cranberry relish with frozen cranberries (couldn't find fresh) but I was very happy with the end result.  I will say that, despite this being very good, for the next time, my husband (who is in charge of the BBQ in our house) has been instructed to get a better sear on the beef, but these ones came off medium rare (which is what we wanted) and were delicious none-the-less.

Cranberry and Rosemary Relish

2 cups of water
1/4 cup good balsamic vinegar
2 cups sugar
600 gram bag of frozen cranberries
2 tsp. of fresh rosemary, chopped fine
1 tsp. kosher salt
3 garlic cloves, pressed

Dissolve sugar in water and vinegar (5 minutes).  Add berries, rosemary, salt and garlic.  Cook over medium heat till berries pop and sauce thickens (25-35 minutes).

For the Beef:

Slice beef tenderloin into thin slices (1/2 thick).  Season with salt and pepper, drizzle with olive oil and let sit.  When ready to serve, grill the beef on hot grill, searing both sides.  (About a minute on each side).  Let rest for a few minutes.

For the Crostinis:

Mix 1/4 cup soft butter with kosher salt and pepper to taste and 1 tsp. of finely chopped rosemary.  Slice baguettes, spread with butter and warm in oven until slightly golden.

Top the crostinis with seared beef and a dollop of the cranberry relish.

Confession of a Baker of Truly Awful, Dry Cakes

I suck at cakes.  Truly, I do.  In fact, my mom's and sister's polite assurances that my cakes are "fine" have finally been replaced with suggestions as they 'troubleshoot' with me. Is it a problem with my oven?  Perhaps the high altitude?   Am I leaving it in too long? While their honest and helpful approach is appreciated, it has not gone unnoticed that the mere utterance of these words is, in effect, an admission on their part that what I say is true.  I suck at cakes.

I baked a cake the other day, feeling optimistic with my new cook book and fueled with my recent inspiration to blog about my creations in the kitchen. I googled 'baking at high altitudes' and took what I learned on the internet and applied it to my recipe.  I increased the liquid by 3 tablespoons, I added an extra 'dollop' of butter, I purchased a thermometer to ensure my oven was at the correct temperature and I took the cake out a whole 8 minutes earlier than the recipe recommended.  

Well, guess what?  It was dry.  When my sister came over I showed her the cake and she concurred that it felt dry, she said that it felt like sponge cake.  (I had not baked a sponge cake.)  Although, to her credit, she did say it smelled nice.  Thanks for that at least.

Needless to say, I am a little discouraged at the moment.  Why can't I figure this out?  I can make creme brulee, crepes, florentines, cookies, homemade pasta, risotto, even buns to name a few.  But cake?  Forget it.

Why is this important?  It's not, really, except that my dad's 65th birthday party is coming up and my sister and I are preparing all the food.  Oh, how we do love to have an excuse to unleash all our pent up creativity in the kitchen.  I feel that it would be wrong to serve the guests all our homemade appetizers and then follow it up with a store bought cake. So I am more determined than ever to get this figured out, and if that means baking several cakes that are thrown out in the interim, so be it. 

Thursday, February 18, 2010

World Peace Cookies


This is my first baking endeavor from Dorie Greenspan's "Baking From my Home to Yours".  Excellent way to to kick off my new hobby, I must say.  These cookies are very decadent, perfect for the chocolate enthusiast, definitely not for the faint of heart.  With an almost 'sandy' crumb and dark chocolate chunks throughout, the hint of saltiness from the addition of fleur de sel gives them the balance they need.  Give them a whirl!

Recipe for World Peace Cookies
(adapted from Dorie Greenspan)

1 1/4 cups flour
1/3 cup unsweetened cocoa
1/2 t. baking soda
11 T. unsalted butter at room temp.
2/3 cup light brown sugar, packed
1/4 cup sugar
1/2 t. fleur de sel
1 t. vanilla
5 ounces bittersweet chocolate, chopped into chips
(I used 3/4 cup chocolate chips)

Sift flour, cocoa and baking soda together.

Beat butter with paddle attachment of a standing mixer on medium speed until soft and creamy.  Add both sugars, salt and vanilla.  Beat for 2 minutes.

Turn off mixer, add all dry ingredients at once.  Pulse the mixer at lowest speed about 5 times until there is no flour on surface. Continue mixing at low speed until the flour is completely incorporated into dough. Do not over mix.  If mixture looks crumbly, that's okay.  Add chocolate chips, mix just to incorporate.

Divide dough into 2. Roll into logs about 1 1/2 inches in diameter.  Wrap each log in plastic wrap and refrigerate until firm (about 2 hours or up to 3 days).

Preheat oven to 325 degrees.  Line two baking sheets with parchment paper.  Using sharp knife, slice the logs into rounds that are 1/2 inch thick.  The rounds will likely crack as you're cutting them, just squeeze the bits back together.  Arrange on baking sheets 1 inch apart.


Bake the cookies one sheet at a time for 12 minutes - they won't look done, but take them out anyway!  Allow them to rest for 5 minutes, remove from tray and put on cooling rack.  Enjoy!


Friday, February 5, 2010

Let the Blogging Begin...

One night, while my husband was off having the time of this life in Vegas, and after I finally put my two munchkins to bed after a very long day, I sat down to enjoy my favorite TV show and realized that it had not recorded on my PVR.  I was unreasonably upset...outraged to be honest.  How pathetic am I that my happiness is so dependent on my TV?  At a complete loss and feeling very deflated, I began puttering around on my computer and stumbled upon a plethora of food blogs that, up until that moment, I had no idea existed.  I was so taken with with the photos and the recipes that I completely forgot how mad I was at my PVR.  I was like a kid in a candy store!

I cannot count how many hours I have wasted just flipping through my ridiculous collection of cook books and gourmet magazines.  How many dinner parties I have planned in my head, from the appetizers I want to make, the platters I want to serve them on,  the garnish I want on the plates for my main course,  the dessert and espresso afterwards, right down to the music I want playing in the background.  Unfortunately, 90% of the time, nothing comes of these rather grandiose plans (or perhaps daydreams is more accurate). Being the mother of 2 very delicious little ones makes time a commodity of which there is never enough. Life just seems to get in the way.

So instead of dreaming of these far-too-rare blissful evenings with friends in which I unveil one culinary triumph after another (a serious daydreamer I am), I decided to scale it back.  I will tackle one small feat at a time. A loaf of bread on a Tuesday afternoon, a batch of chocolate chip cookies, or a 4 tier chocolate cake for no occasion at all.  

And while I'm at it, why not blog about it so I keep a running tab of my triumphs and failures in the kitchen?  So here I am.  A complete and utter rookie at this blogging thing but I am learning.  Slowly.

After viewing several blogs, it became evident to me that, despite my already ridiculous collection of cook books, I would need to add a few new ones to my repertoire.  They have been ordered, and in fact, I have received 2 already, "Baking From my Home to Yours" and "Baking with Julia" both by Dorie Greenspan. If these don't get me moving in my kitchen, I am truly a lost cause. Time will tell.
Related Posts with Thumbnails